


Easily link your Shopify shop
Using the following information, you can easily link Shopify and get started immediately with sending your products via Wuunder. At the touch of a button you can send documents, packages and pallets with the most suitable carrier. Would you like to receive more information first? Then read here further, and contact me if you are interested.
SHOPIFY SHIPPING MODULE
- Do you want more information about Shopify or does the linking work? Please contact us customer service.
- Wuunder has both a test and production environment. We recommend that you test the operation of your shop thoroughly in the test environment before going live. Activate the test environment through this one link.
- Make a backup of your webshop and download the Shopify plug-in via the Shopify Marketplace.
- From January 1, 2023, Wuunder's Dynamic Check-Out is no longer possible with the Shopify Starter and Basic package.
Just a second important! After activating the plug-in, you must link your webshop to Wuunder. Take the following into account: the Wuunder Webshop Connector and Wuunders booking system have different login details. If you don't have login details, you will have to go through the onboarding process first. You cannot log in to the Wuunder Webshop Connector with the login details of your MyWuunder account. From step 3 in “Linking Shopify with Wuunder” this is completely explained.
Link Shopify with Wuunder
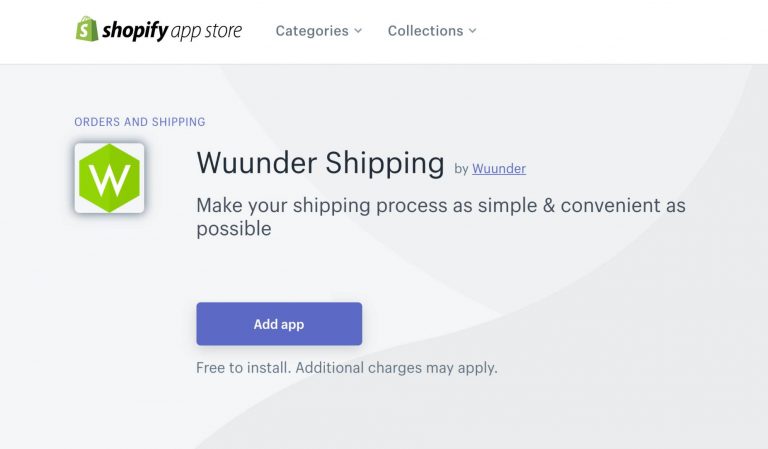
Step 1 - Log in to your Shopify store admin area. Go to apps and search for the Wuunder Shipping app. You can also go straight to the market place by here to click. Then make sure you're logged in to the Shopify marketplace. If you want to install the plug-in, click Add app.
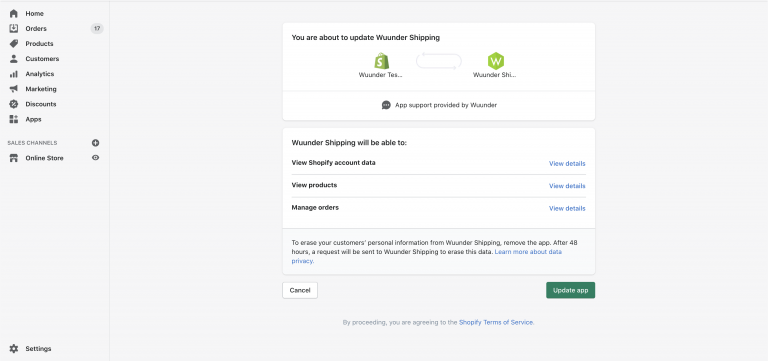
Step 2 - Once you click on Add app, you will be returned to your shop's admin. After this you will see a screen asking if you want to download the plug-in. It also indicates which data the plug-in of your shop will use. To continue, click Update app.
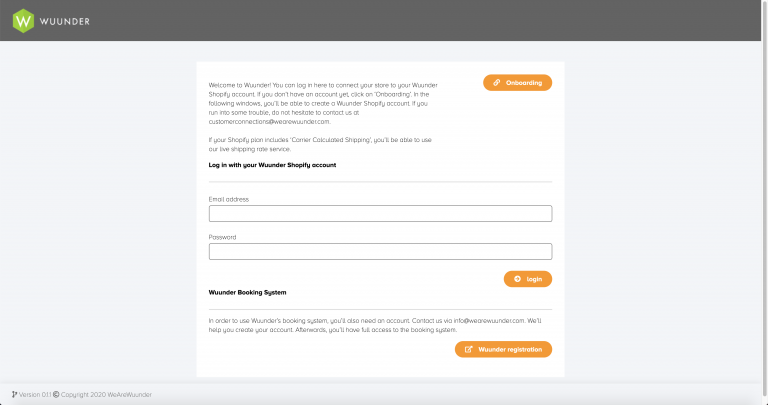
Step 3 - After pressing the button for the environment, you will be taken to a page where you will be asked to log in to 'Wuunder Webshop Connector'. If you don't have any login details yet, click on Onboarding. (Note! Wuunder's booking system has a different login, which is not the same at the moment). If you do have login details, log in and proceed to step.
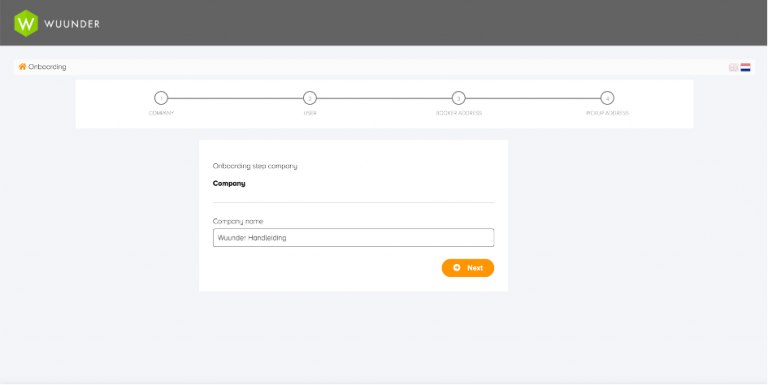
Step 4 - When you have clicked on Onboarding, the wizard will start to link your webshop. Complete all steps.
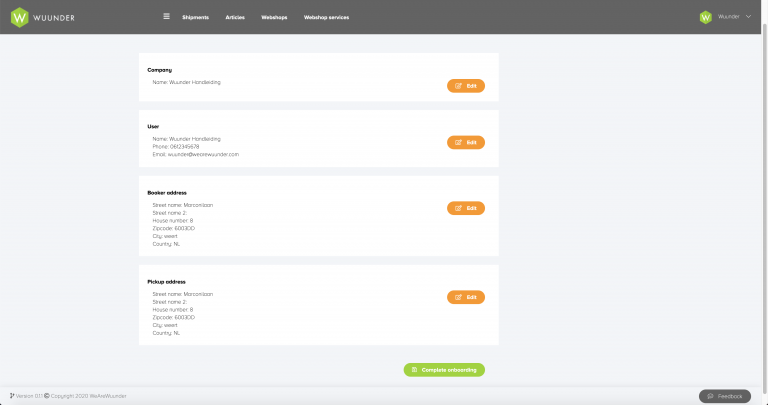
Step 5 - After the wizard has finished, you will see an overview page with all the information entered. You can check if everything is correct. Everything correct? Then click on Complete onboarding. Adjust if something is not correct.
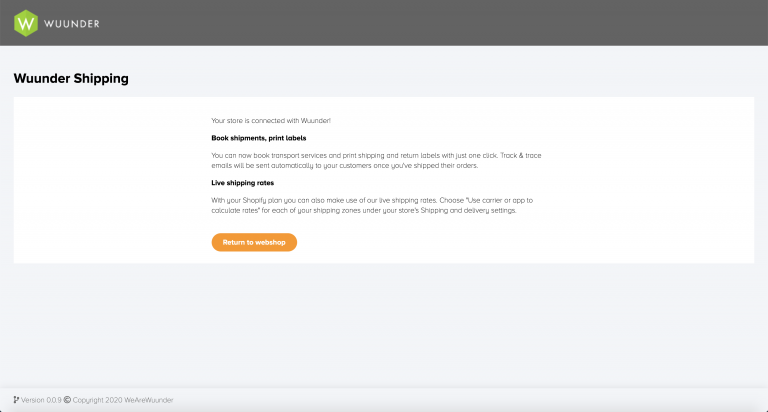
Step 6 - After clicking 'Complete onboarding', you will see the Welcome to Wuunder screen. At that moment your webshop is connected to our 'Wuunder Webshop Connector' system. Our team will therefore set to work further to set up your account. We will therefore contact you to determine which carriers should be set up and with which transport services. If you are not automatically redirected to your webshop, click on the 'Return to webshop' button.
Link Shopify integration to MyWuunder
Step 1 - Sign up or log in via MyWuunder.
Step 2 - As soon as you are logged in, Wuunder will contact you and activate your account.
Import orders into MyWuunder
When your shop is linked to Wuunder, you can easily and quickly book orders. You do this by means of the following steps:
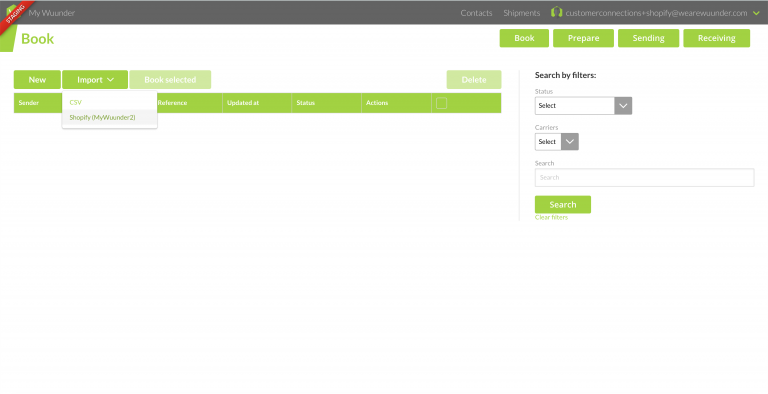
Step 1 - Once you are logged into your MyWuunder account, go to Shipments. Here you will see a dropdown menu. Select Book.
Step 2 - Click Import and select Shopify (MyWuunder2).
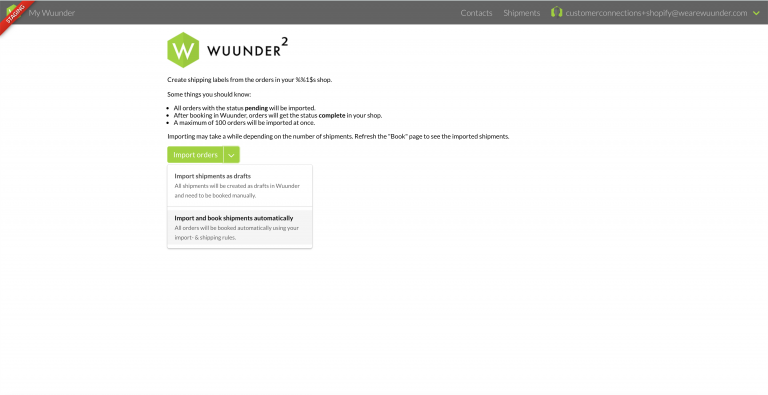
Step 3 - You are now on the import page. By clicking on the arrow symbol next to Import orders, you can choose how you want to import the orders. Do you want to book all orders manually? Select Import shipments as drafts. Do you want all orders to be booked equally and you do not have to do anything yourself? Select Import and book shipments automatically.
Step 4 - When you have selected how you want to import the orders, click on Import.
Step 5 - You are now on the Book page. Here you can see all imported orders. If you have the option Import and book shipments, you will see the status of the orders as Booked. You can proceed to step 7. If you selected Import shipments as draft, you still have to post the orders manually. The status of these orders is Draft. Now proceed to step 6.
Step 6 - You can now manually book each order separately. You will find how you do that here. You can also choose to book multiple draft shipments at the same time. You can get more information about this here find.
Step 7 - Once you have booked the shipments, you can go to Prepare. Here you can print the shipping labels. If you want to know more about printing shipping labels, click here.
