


easy shipping with Shopware
Using the following information you can easily send with Shopware. At the touch of a button you can send documents, parcels and pallets with the most suitable carrier. Would you like to receive more information first? Then read here further, and contact me if you are interested.
SHOPWARE SHIPPING MODULE
- The Shopware shipping module is suitable up to and including version 5.6.7 of the webshop. In addition, we also support Shopware 6. Are you working with a different version, would you like more information about Shopware 6 or is the pairing not successful? Please contact our customer service.
- Wuunder has both a test and production environment. We recommend that you test the operation of your shop thoroughly in the test environment before going live. Activate the test environment through this link.
- Make a backup of your webshop and download the Shopware plug-in via the Shopware marketplace.
Shopware configuration
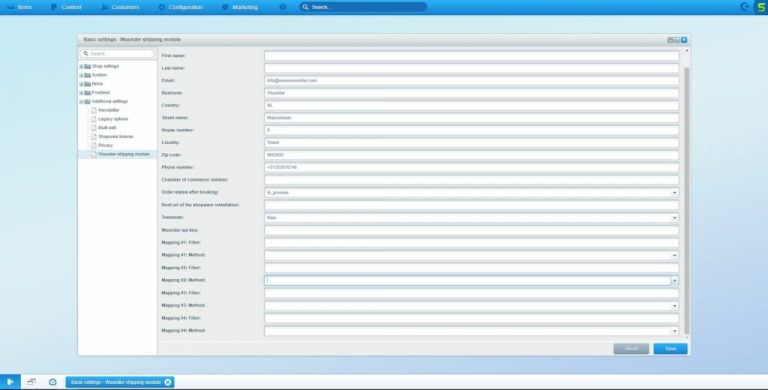
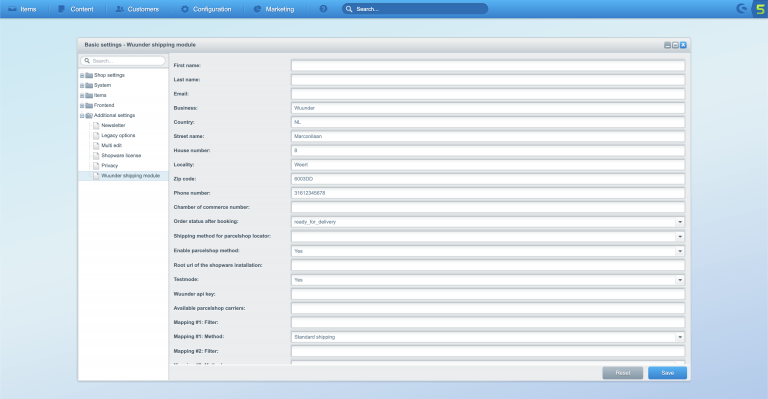
Step 2 - Then click Additional settings and then on Wuunder shipping module. Then complete the company details.
- Provide the company name and address where the shipments are to be collected by the carrier (s). The information you enter here will be visible on the shipping label, so that the driver of the carrier knows where the shipments must be picked up and delivered (returns).
- The email address you use here will also receive all the labels you create. This can be, for example, the email address of the warehouse that prepares the shipments.
- After you have booked a shipment with Wuunder, we automatically update the status of your order in Shopware. You can determine the status yourself after booking. Usually shops choose the status "Complete".
- In the field Root URL of the Shopware installation enter where Shopware is installed on your domain. Example: mijndomein.nl/shopware.
- In the field Wuunder API key enter the API key you received from Wuunder. If you don't plan to test, choose "Do not" at the field "Test mode". read here more about the test and production environment and how to request the API keys.
- At the different Mapping # 1 filter Methods you can choose shipping methods that you show to your customer during checkout. If you want to know which services you can use, go to Wuunder filters. Enter the name of the service you want to use in the checkout such as: dpd or dhl_parcel. We immediately show the chosen service by the customer when booking the shipment with a blue dot.
- When all details have been entered, click on at the bottom of the page "Save". Hoera; the plugin is now configured!
Step 3 - Now go to your shop and test if everything is still working properly. Sometimes it can happen that the plug-in conflicts with already installed plug-ins. If you don't need the other plugins, it's best to remove them.
Please note!
Our plug-in is made on the basis of the standard check-out page of the webshop environment. As a result, when changes are made and / or a plug-in is used for the check-out, our plug-in no longer functions properly. So keep this in mind if the standard check-out page has been adjusted or a completely different one is used.
Plugin Configuration
After you have made adjustments to the settings of the Wuunder plugin, we advise to empty the cache from Shopware. The settings affect the checkout process and cannot be applied due to the cache. You empty the cache by following these steps:
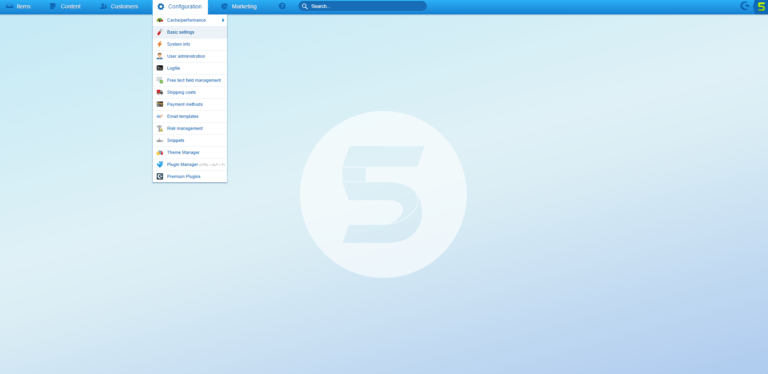
Step 1: Open your Shopware dashboard, and click"Configuration".
Step 2: Now click on "Cache / Performance" and select Clear shop cache.

Now the cache of the website has been cleared. The first time the website is shown it may take a little longer to load, but this is a one-off.
Have your customer send a shipment directly to a parcel shop
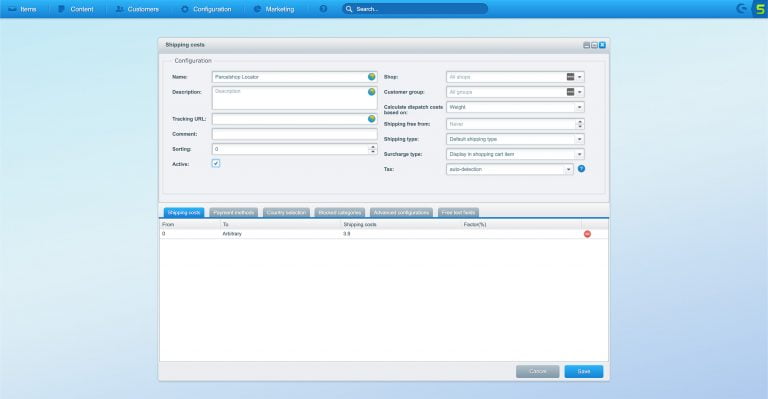
TIP! To activate the Parcelshop Locator you must first create a new shipping method. We recommend the Standard shipping duplicate method and name it “Parcel Shop Locator” to give. Configure the rest of the settings as desired using the following steps:
Step 1 - On your Shopware dashboard, click Configuration and then on Shipping costs.

Step 2 - Click behind Standard shipping on the duplicate icon.
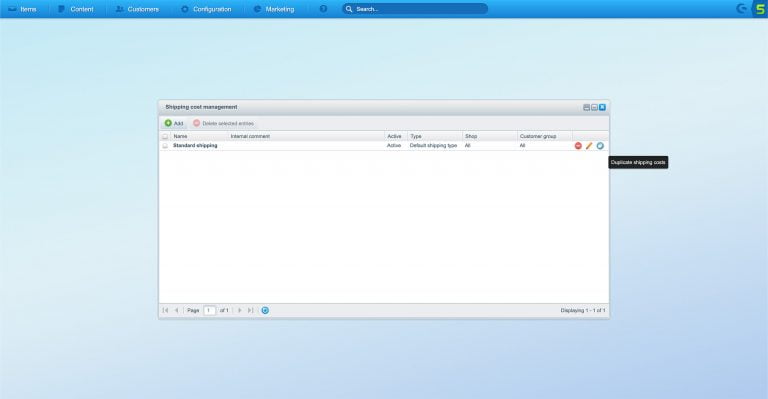
Step 3 - We recommend changing the name to something like “Parcel Shop Locator” to prevent confusion.
Step 4 - Go back to your Shopware dashboard and click Configuration and then on Basic settings.

Step 5 - Click Additional settings and then on Wuunder shipping module. At Shipping method for parcelshop locator select the new shipping method you just created. Make sure that at least one of the Mapping Methods your new shipping method is also selected.
Step 6 - YES! The Parcelshop Locator is now configured!
Give your customer a wide choice in your shopware checkout
Optimize your check-out in your shop and boost your sales. Know how to? Check it out below.
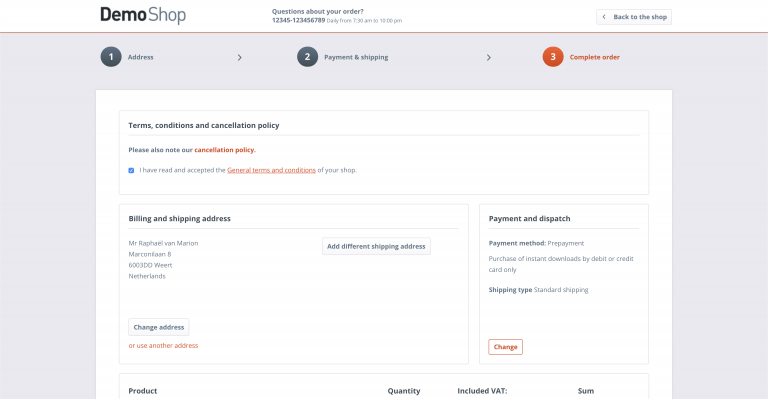
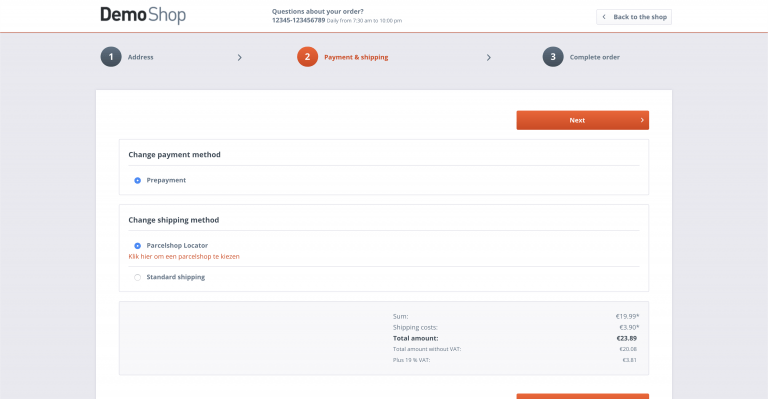
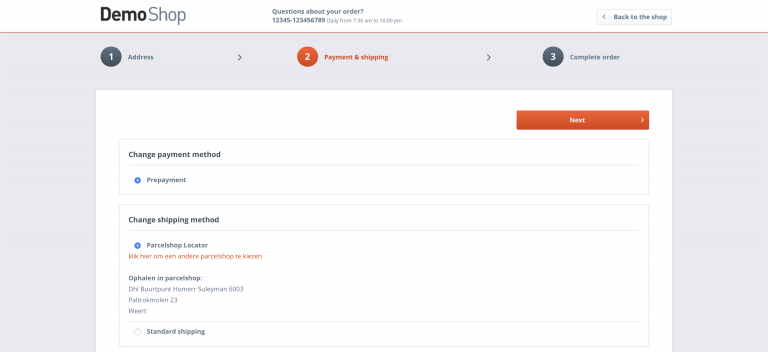
1. Once in the checkout, the customer can go under the heading Payment and dispatch on the button Change click to change the shipping method.
2. After that, the customer can choose the “Parcel Shop Locator” option then press "Click here to select a Parcelshop" click.
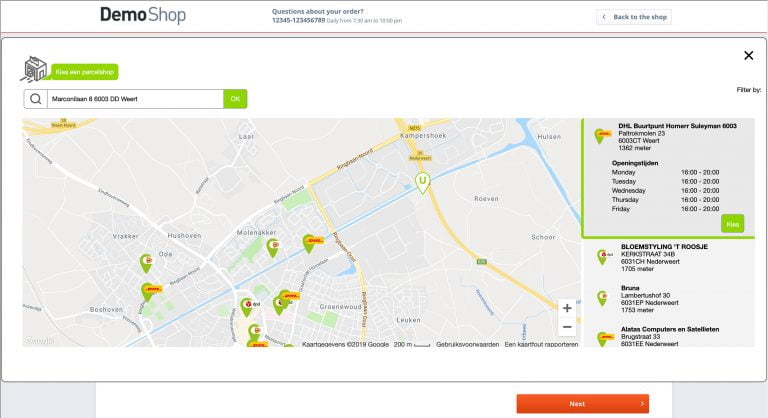
3. Here the customer can choose a Parcelshop as desired. Even the opening times can be seen!
4. The new delivery address is now the chosen Parcelshop.
Send orders via shopware
Step 1 - In your Shopware dashboard, use the following button combination to access the "Orders" overview to come: CTRL + ALT + B (Windows) CONTROL + OPTION + B (Mac)
Step 2 - Click on the green icon behind an order. You can only generate shipping labels for shipments you create after installing the plug-in. These orders are provided with the necessary shipping information by the Wuunder module. Send all old orders by re-creating an order in Shopware or booking them via MyWuunder. If you are still testing the module then you read here more the test environments.
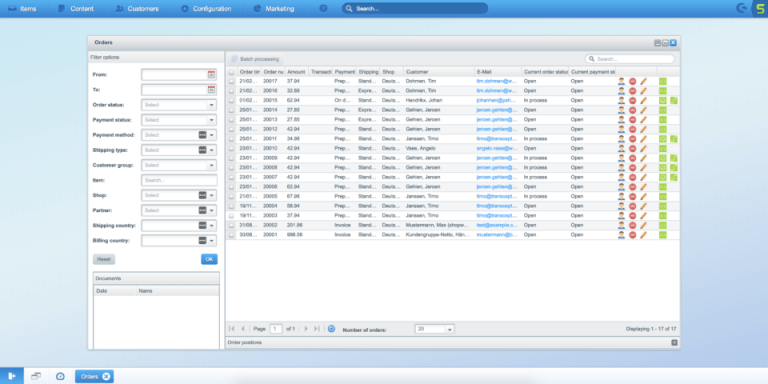
Step 3 - We will then check your submitted data and you can book the shipment. read here all details. You will then return to the Shopware order overview.
Step 4 - You can then print the shipping label directly from your shop. Would you like more information about quickly printing your shipping labels or printing a shipping label by scanning a packing slip? Then click here. Return a shipment? That is also super easy. Find out all about it through this link.
Step 5 - By clicking on the green Track & trace icon in the Shopware order overview you can also follow the shipment. In MyWuunder you can easily see the latest status of each shipment and you can quickly identify possible issues.
